Tracker de Cryptos Notion avec Prix LIVE [Tuto + Template]
Les crypto-monnaies et les NFT (jetons non fongibles) ont acquis une immense popularité au cours des dernières années. En conséquence, de nombreuses personnes ont commencé à investir dans ces actifs numériques. Cependant, le suivi des prix et des portefeuilles de ces actifs peut être assez difficile. C'est là qu'intervient Notion.
Notion est un outil puissant qui peut vous aider à suivre les prix et les portefeuilles des crypto-monnaies et des NFT. Dans cet article de blog, nous discuterons des avantages de l'utilisation de Notion pour le suivi des crypto-monnaies. Nous fournirons également un guide étape par étape sur la façon d'obtenir les prix des actifs en temps réel dans Notion via une automatisation.
Cours des crytpos en temps réel dans Notion
Créez un compte Notion
Si vous n'en avez pas déjà un, créer un compte Notion. Tout ce qui figure sur ce blog fonctionne avec un compte Notion gratuit.
Si vous êtes nouveau sur Notion, consultez mon autre post qui sert de référence pour démarrer avec Notion. Il couvre tout ce que vous devez savoir, alors lisez-le !
Base de données des actifs
Maintenant que vous avez un compte Notion, ou que vous êtes connecté à votre compte existant, nous allons configurer la base de données « Actifs ».
C'est la base de données la plus simple que vous puissiez imaginer :
- Créez une nouvelle base de données, appelez-la « Actifs » et sélectionnez la vue « Tableau »
- Changez le nom du titre en « Ticker » et ajoutez-en au moins l'un d'entre eux (par exemple, BTC)
- Ajoutez une propriété numérique, appelez-la « Prix en direct »
C'est tout pour le moment.

⚠️ Le reste du tutoriel est en anglais!
Get your API key from CoinAPI
- Go to CoinAPI
- Click on “Get a free API key” & complete the form
- You should have received an email from them in your inbox, and it should look like this
- Copy your API key and keep the email somewhere safe.

Set your Make environment
- If you don’t have one already, create an account on Make (affiliated)
- Download this “blueprint” (JSON file) - it’s the automation that you’ll need to import in Make.
- In Make, click on
- Create a new scenario
- The 3 dots icon “...” (at the bottom, at the right of the plane icon)
- Import Blueprint
- Select the file you just downloaded (”Make blueprint - current crypto prices.json”)
⚠️ If you never used Make before, you will have to connect your Notion workspace. Click on the first Notion icon (in the Make scenario), click “Add” in the “Connection” section and follow the steps. Then select the same connection for the third (Notion) module.
Build the automation
Module N°1
1. Click on the first Notion module
2. Click Add a new connection (Connection type = Public)
3. Follow the steps and make sure that your “Assets” database is contained in the pages that you select. You can select all pages from your workspace to be sure.
4. You first want to connect your “Assets” database to the first step of the Make scenario. You have two possibilities:
- Option 1: Click on the “Search” button, on the right of the “Database ID” section. Then type the exact name of the database (in your case “Assets”).
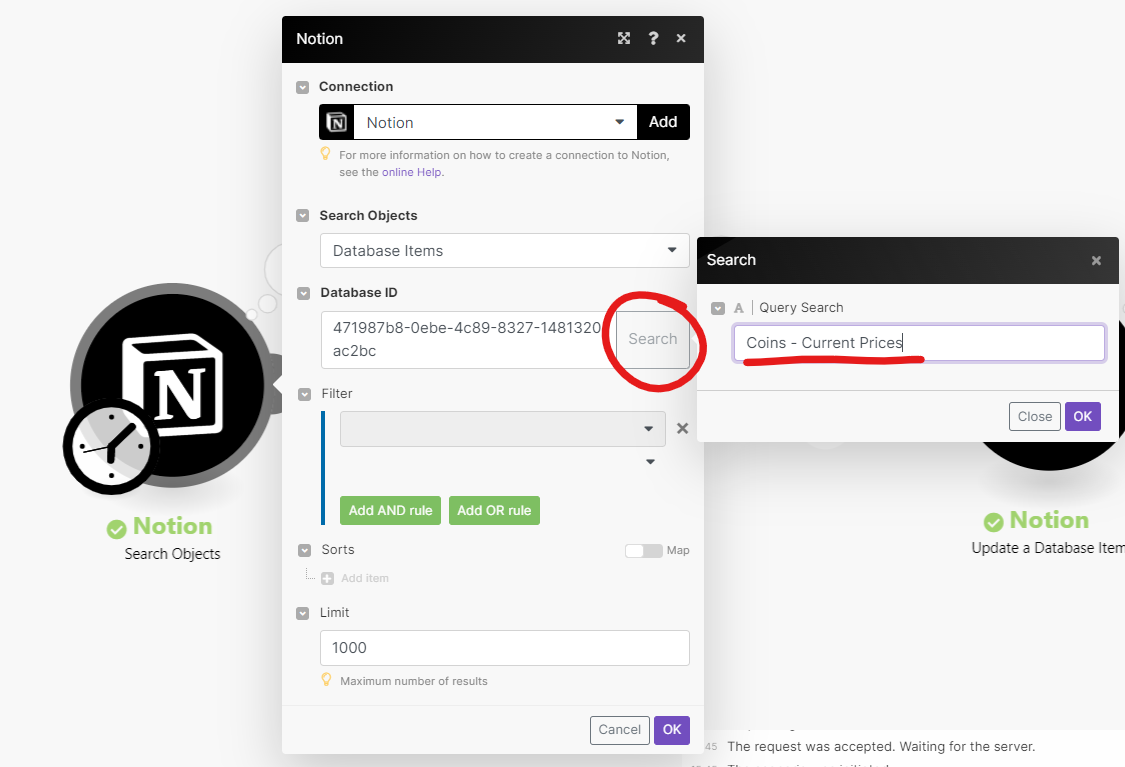
- Option 2: Go to the “Assets” database and copy the database ID. The database ID is the first part of your URL, when you’re on the database page, after the “/” and before the “?”.

5. Increase the limit to 1000 if it's not the case.
6. Your module should look something like that:

7. Click “OK”.
8. Right-click on the module, and select “Run this module only.” It should not return any error (in red) & you should have a 1 in the small bubble.
⚠️ If you get an error such as “Account doesn’t exist […]”, add your own Notion connection to the second Notion module.
Module N°2
1. Click on the 2nd module (HTTP)
2. If it’s not already set up (it should be), in the URL field, replace the item in black with your own one. Keep the “https://rest.coinapi.io/v1/assets/” part of the URL, click in the field, then select your asset name from your Notion database. (”properties values” → “Ticker” → “plain_text”)
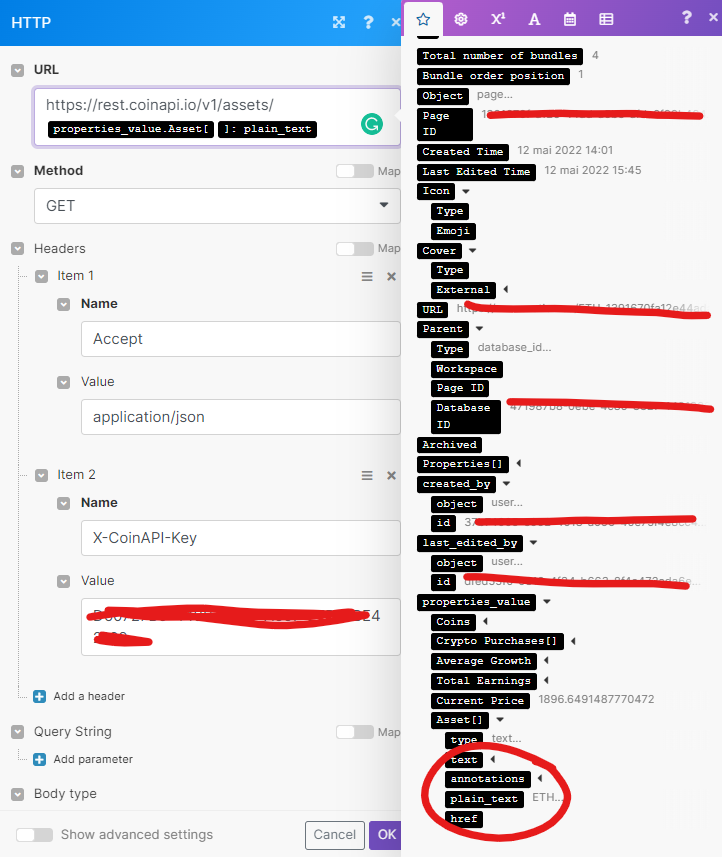
3. In the “Headers” section → “Item 2” → “Value”, paste your API key (the one you copied a few steps above)
4. Don’t change anything else. Your module should look like that.

5. Click “OK”.
6. Right-click on the module → “Run this module only” → Input BTC in the “plain text” section of the “properties_value” field. It should not return any error (in red) & you should have a 1 in the small bubble.
Module N°3
1. If you haven’t already, connect your own Notion account (select the same you created from module 1)
2. In the “Database ID” field, paste the same database ID as the one in the 1st module.
3. In the “Database Item ID" field, select “Page ID” of the 1st Notion module.
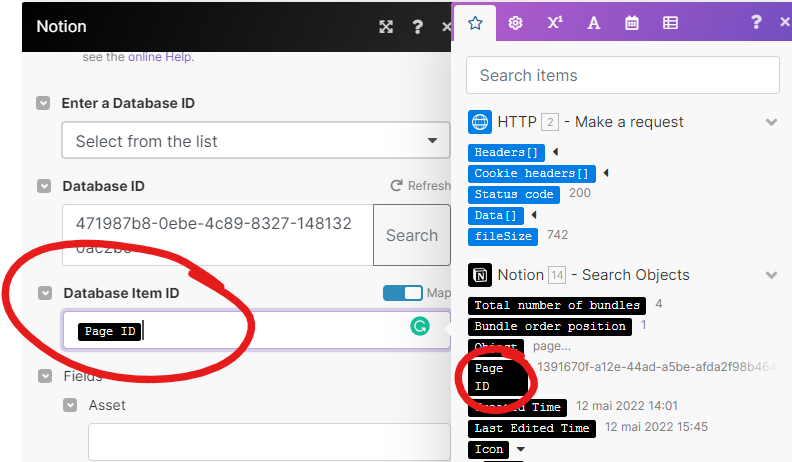
4. In the “Current Price” field, select “price_usd” of the HTTP module.

5. Click “OK”.
Filter between Module 2 & 3
1. Click on the dots between the 2nd and the 3rd module. It should open the filter.
2. Your condition should be: properties_value.Ticker[ ]:plain_text “Equal to” Data[ ]:asset_id

3. Click “Ok”.
Final Steps
- Run the entire scenario using the "Run Once" button (bottom-left of your screen). You will see the current prices in your Assets database!
- You can now choose the frequency of updates by clicking on the clock attached to the first module.

Notion template
If you're feeling overwhelmed by the setup process, fear not! We've got you covered with a Notion template that not only includes all the necessary layouts but also comes with an optional automation setup. So don't let the setup process hold you back from tracking your crypto investments like a pro.
Purchase the template
Track your Crypto Investments in Notion
Now that you have your live crypto prices, it’s time to set up your portfolio system.
Build your Purchases database
This is the database where you’ll be adding all the crypto purchases you’ll make along your journey.
- Add a new table database and call it “Purchases”
- Add a relation property to the Assets database (a two-way relation) and call it “Ticker”
- Add two “Number” properties: one called “$ spent” (set the “Number format” as $) and one called “Coins gotten”. These will be the two fields that you’ll have to fill out when you buy new cryptos (”$ spent” is your purchase price in $, “Coins gotten” is the number of coins you got for that price).
- Add a formula property called “Asset purchase price”. The formula should be: prop("$ spent") / prop("Coins gotten") . This will be the current value of the asset at the time you bought it.
- Add a rollup property called “Current asset price”. This rollups the live asset price from the Assets database. Set it up as follows: Relation → Ticker, Property → ”Current Price”, Calculate → Sum
- Add a formula property called “Growth” where the formula is prop("Current asset price") / prop("Asset purchase price"). This is the growth (positive or negative) you had between purchase price and live price. Set the “Number format” as percent.
- Add a formula property called “Current value” where the formula is prop("Coins gotten") * prop("Current asset price"). This is the current amount of $ you have for that transaction. Set the “Number format” as $.
- Add a formula called “Earnings” where the formula is prop("Current value") - prop("$ spent"). This is the balance (positive or negative) from your purchase. Set the “Number format” as $.
That’s it. You should have something like this:

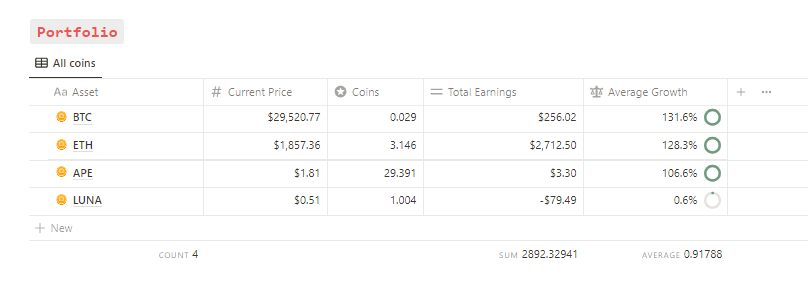
Customize your Assets database
Now, thanks to the purchase database, you know your current growth, value, and earnings for each transaction that you made. However, what's missing are the total values per asset (i.e., total earnings and average growth you have for all your BTC or ETH). This is what we're doing now.
- Go to your Assets database
- Now that Assets is linked to Purchases, you can retrieve some information.
- Add a rollup property and call it “Total earnings”. Set it up as follows: Relation → “Purchases”, Property → “Earnings”, Calculate → Sum. This property now gives you your total earnings for each ticker.
- Add a rollup property and call it “Average Growth”. Set it up as follows: Relation → “Purchases”, Property → “Growth”, Calculate → Average. This property now gives you your average growth for each ticker.
- Add a rollup property and call it “Coins”. Set it up as follows: Relation → “Purchases”, Property → “Coins gotten”, Calculate → Sum. This property now gives you your total coins for each ticker.
Don’t forget to add a Sum & Average calculations at the bottom of the database to know your total earnings and growth for all tickers.
Template Notion
J'ai créé un template Notion déjà configuré avec toutes ces étapes. Il y a deux plans :
- le template Notion tout seul (€39.00)
- le template Notion + configuration de l'automatisation incluse (€259.00)
Achète le template Notion ici
Conclusion
Notion offre une excellente plateforme pour suivre les prix et les portefeuilles de cryptomonnaies et de NFTs. Avec le guide étape par étape fourni dans ce blog, tu peux facilement obtenir les prix d'actifs en direct sur Notion via une automatisation. De plus, en créant une base de données d'achats et en personnalisant ta base de données d'actifs, tu peux suivre tes investissements comme un pro.
Alors, qu'est-ce que tu attends ? Commence à suivre tes investissements en crypto sur Notion aujourd'hui et prends le contrôle de ton avenir financier.
Créé ton compte Notion gratuitement 🙃 (#NotionPartner)
Vous pouvez suivre les prix et les portefeuilles des crypto-monnaies et des NFT à l'aide de Notion, un outil puissant qui fournit les prix des actifs en direct pour ces actifs numériques. Vous pouvez utiliser Notion pour créer une base de données « Actifs » et configurer l'authentification via CoinAPI. En suivant un processus de configuration détaillé, vous pouvez configurer une automatisation pour obtenir les prix en temps réel directement dans votre espace de travail Notion.
La base de données « Achats » du Notion tracker est l'endroit où vous ajoutez tous les achats cryptographiques que vous avez effectués. Cette base de données permet de calculer votre croissance, votre valeur et vos revenus actuels pour chaque transaction que vous avez effectuée. Il fournit également des valeurs totales par actif, telles que les revenus totaux et la croissance moyenne de tous vos Bitcoins ou Ethereums.
Notion fournit une plate-forme complète pour le suivi des investissements cryptographiques. Il vous permet d'obtenir les prix des actifs en temps réel via une configuration automatisée et de créer des bases de données personnalisées pour suivre vos achats et vos revenus totaux. Le système de suivi de Notion vous permet d'évaluer la croissance de vos investissements et de contrôler efficacement vos décisions financières.
Latest posts
Templates that (truly) work