Notion Crypto Portfolio Tracker With Live Crypto Price
Cryptocurrencies and NFTs (Non-Fungible Tokens) have been gaining immense popularity over the past few years. As a result, many people have started investing in these digital assets. However, tracking the prices and portfolios of these assets can be quite challenging. This is where Notion comes in.
Notion is a powerful tool that can help you track the prices and portfolios of cryptocurrencies and NFTs. In this blog post, we will discuss the benefits of using Notion for tracking cryptocurrencies. We will also provide a step-by-step guide on how to get the live asset prices in Notion via an automation.
Live Asset Prices in Notion
Create a Notion account
If you don't already have one, create a Notion account. Everything in this blog works with a free Notion account.
If you're new to Notion, check out my other post that serves as a reference for getting started with Notion. It covers everything you need to know, so give it a read!
Assets database
Now that you have a Notion account, or that you’ve logged into your existing account, we’re gonna set up the “Assets” database.
It’s the most simple database you can imagine:
- Create a new database, call it “Assets”, and select the “Table” view
- Change the Title name to “Ticker” and add at least one of them (eg, BTC)
- Add a number property, call it “Live price”
That’s it for now.

Get your API key from CoinAPI
- Go to CoinAPI
- Click on “Get a free API key” & complete the form
- You should have received an email from them in your inbox, and it should look like this
- Copy your API key and keep the email somewhere safe.

Set your Make environment
- If you don’t have one already, create an account on Make (affiliated)
- Download this “blueprint” (JSON file) - it’s the automation that you’ll need to import in Make.
- In Make, click on
- Create a new scenario
- The 3 dots icon “...” (at the bottom, at the right of the plane icon)
- Import Blueprint
- Select the file you just downloaded (”Make blueprint - current crypto prices.json”)
⚠️ If you never used Make before, you will have to connect your Notion workspace. Click on the first Notion icon (in the Make scenario), click “Add” in the “Connection” section and follow the steps. Then select the same connection for the third (Notion) module.
Build the automation
Module N°1
1. Click on the first Notion module
2. Click Add a new connection (Connection type = Public)
3. Follow the steps and make sure that your “Assets” database is contained in the pages that you select. You can select all pages from your workspace to be sure.
4. You first want to connect your “Assets” database to the first step of the Make scenario. You have two possibilities:
- Option 1: Click on the “Search” button, on the right of the “Database ID” section. Then type the exact name of the database (in your case “Assets”).
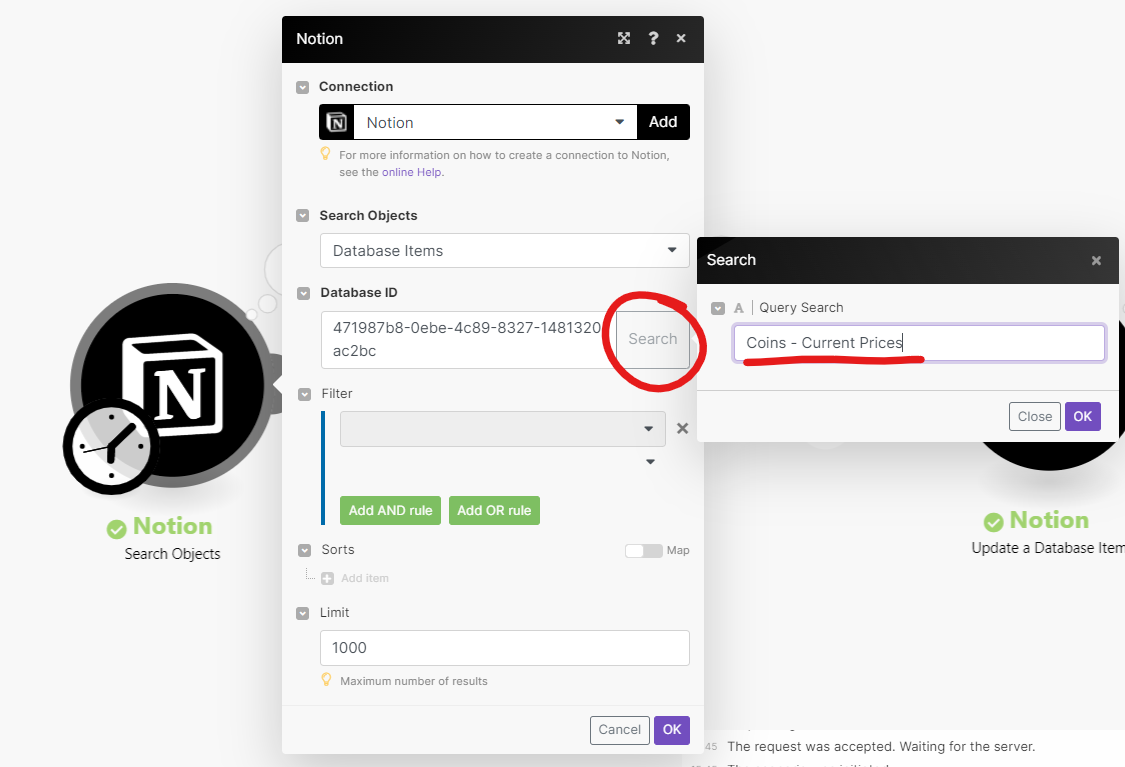
- Option 2: Go to the “Assets” database and copy the database ID. The database ID is the first part of your URL, when you’re on the database page, after the “/” and before the “?”.

5. Increase the limit to 1000 if it's not the case.
6. Your module should look something like that:

7. Click “OK”.
8. Right-click on the module, and select “Run this module only.” It should not return any error (in red) & you should have a 1 in the small bubble.
⚠️ If you get an error such as “Account doesn’t exist […]”, add your own Notion connection to the second Notion module.
Module N°2
1. Click on the 2nd module (HTTP)
2. If it’s not already set up (it should be), in the URL field, replace the item in black with your own one. Keep the “https://rest.coinapi.io/v1/assets/” part of the URL, click in the field, then select your asset name from your Notion database. (”properties values” → “Ticker” → “plain_text”)
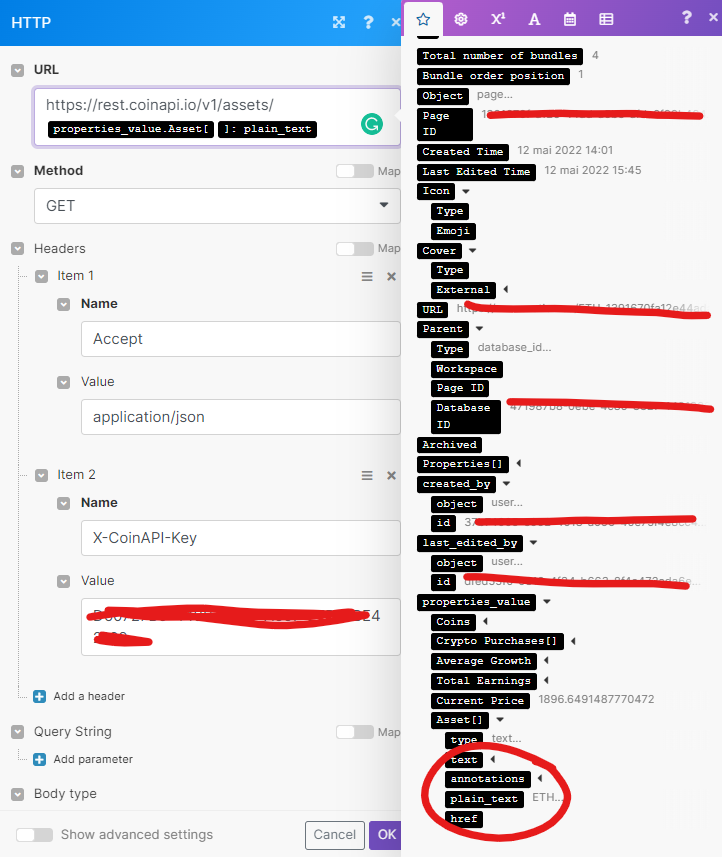
3. In the “Headers” section → “Item 2” → “Value”, paste your API key (the one you copied a few steps above)
4. Don’t change anything else. Your module should look like that.

5. Click “OK”.
6. Right-click on the module → “Run this module only” → Input BTC in the “plain text” section of the “properties_value” field. It should not return any error (in red) & you should have a 1 in the small bubble.
Module N°3
1. If you haven’t already, connect your own Notion account (select the same you created from module 1)
2. In the “Database ID” field, paste the same database ID as the one in the 1st module.
3. In the “Database Item ID" field, select “Page ID” of the 1st Notion module.
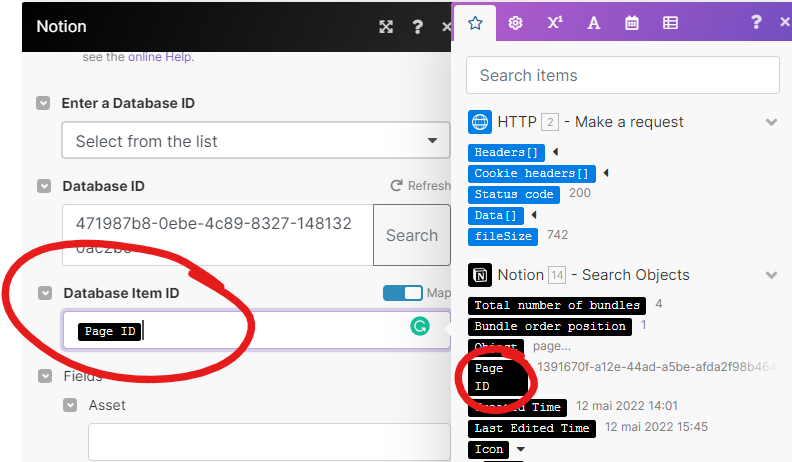
4. In the “Current Price” field, select “price_usd” of the HTTP module.

5. Click “OK”.
Filter between Module 2 & 3
1. Click on the dots between the 2nd and the 3rd module. It should open the filter.
2. Your condition should be: properties_value.Ticker[ ]:plain_text “Equal to” Data[ ]:asset_id

3. Click “Ok”.
Final Steps
- Run the entire scenario using the "Run Once" button (bottom-left of your screen). You will see the current prices in your Assets database!
- You can now choose the frequency of updates by clicking on the clock attached to the first module.

Notion template
If you're feeling overwhelmed by the setup process, fear not! We've got you covered with a Notion template that not only includes all the necessary layouts but also comes with an optional automation setup. So don't let the setup process hold you back from tracking your crypto investments like a pro.
Purchase the template
Track your Crypto Investments in Notion
Now that you have your live crypto prices, it’s time to set up your portfolio system.
Build your Purchases database
This is the database where you’ll be adding all the crypto purchases you’ll make along your journey.
- Add a new table database and call it “Purchases”
- Add a relation property to the Assets database (a two-way relation) and call it “Ticker”
- Add two “Number” properties: one called “$ spent” (set the “Number format” as $) and one called “Coins gotten”. These will be the two fields that you’ll have to fill out when you buy new cryptos (”$ spent” is your purchase price in $, “Coins gotten” is the number of coins you got for that price).
- Add a formula property called “Asset purchase price”. The formula should be: prop("$ spent") / prop("Coins gotten") . This will be the current value of the asset at the time you bought it.
- Add a rollup property called “Current asset price”. This rollups the live asset price from the Assets database. Set it up as follows: Relation → Ticker, Property → ”Current Price”, Calculate → Sum
- Add a formula property called “Growth” where the formula is prop("Current asset price") / prop("Asset purchase price"). This is the growth (positive or negative) you had between purchase price and live price. Set the “Number format” as percent.
- Add a formula property called “Current value” where the formula is prop("Coins gotten") * prop("Current asset price"). This is the current amount of $ you have for that transaction. Set the “Number format” as $.
- Add a formula called “Earnings” where the formula is prop("Current value") - prop("$ spent"). This is the balance (positive or negative) from your purchase. Set the “Number format” as $.
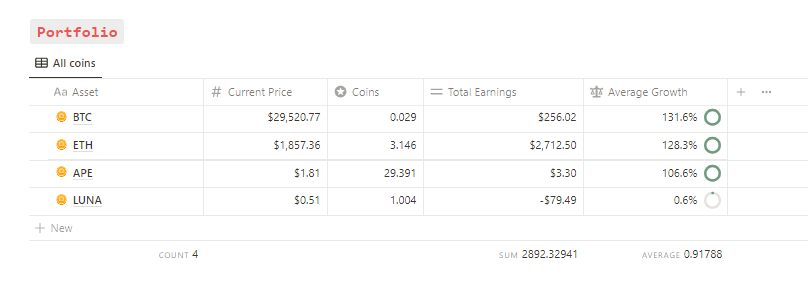
That’s it. You should have something like this:

Customize your Assets database
Now, thanks to the purchase database, you know your current growth, value, and earnings for each transaction that you made. However, what's missing are the total values per asset (i.e., total earnings and average growth you have for all your BTC or ETH). This is what we're doing now.
- Go to your Assets database
- Now that Assets is linked to Purchases, you can retrieve some information.
- Add a rollup property and call it “Total earnings”. Set it up as follows: Relation → “Purchases”, Property → “Earnings”, Calculate → Sum. This property now gives you your total earnings for each ticker.
- Add a rollup property and call it “Average Growth”. Set it up as follows: Relation → “Purchases”, Property → “Growth”, Calculate → Average. This property now gives you your average growth for each ticker.
- Add a rollup property and call it “Coins”. Set it up as follows: Relation → “Purchases”, Property → “Coins gotten”, Calculate → Sum. This property now gives you your total coins for each ticker.
Don’t forget to add a Sum & Average calculations at the bottom of the database to know your total earnings and growth for all tickers.
Notion Template
I’ve made a Notion template already set up with all of these steps. There are two plans:
- the Notion template only (€39.00)
- the Notion template + automation setup included (€259.00)
Purchase the Notion template
Conclusion
Notion provides an excellent platform for tracking the prices and portfolios of cryptocurrencies and NFTs. With the step-by-step guide provided in this blog post, you can easily get the live asset prices in Notion via an automation. Additionally, by setting up a purchases database and customizing your assets database, you can track your investments like a pro.
So, what are you waiting for? Start tracking your crypto investments in Notion today and take control of your financial future.
Start now & create your Notion account 🙃
(#NotionPartner)
You can track the prices and portfolios of cryptocurrencies and NFTs using Notion, a powerful tool that provides live asset prices for these digital assets. You can use Notion to create an 'Assets' database and setup authentication via CoinAPI. By following a detailed setup process, you can configure an automation to get live prices directly into your Notion workspace.
The 'Purchases' database in the Notion tracker is where you add all the crypto purchases you made. This database helps to calculate your current growth, value, and earnings for each transaction that you made. It also provides total values per asset like total earnings and average growth for all your Bitcoins or Ethereums.
Notion provides a comprehensive platform for tracking crypto investments. It allows you to get live asset prices via an automation setup and create personalized databases for tracking your purchases and total earnings. Notion's tracking system enables you to assess your investment growth and control your financial decisions effectively.
Latest posts
Templates that (truly) work